Skip to main content
Promotions
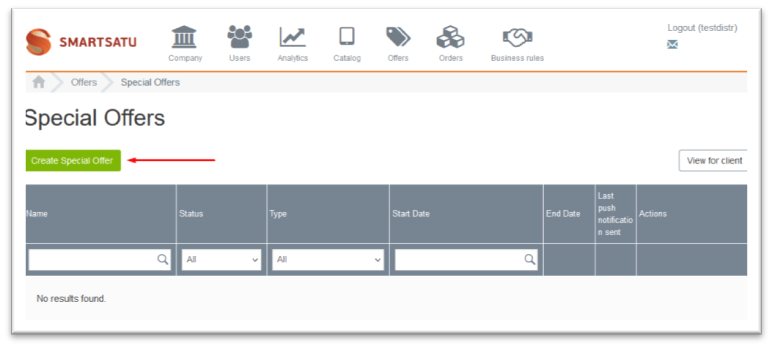
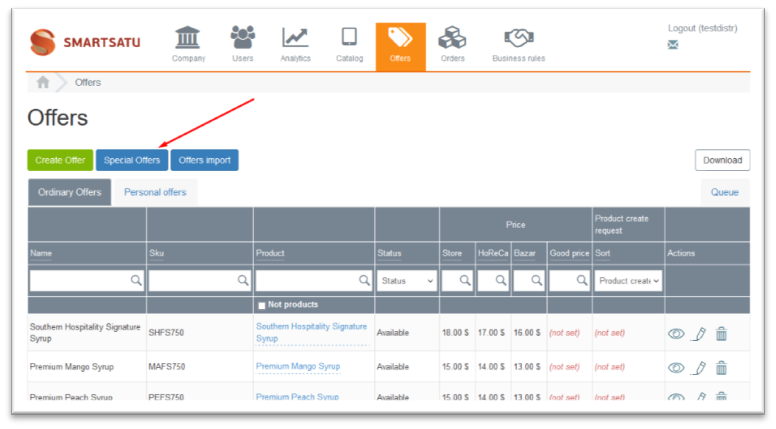
To create a new promotion under the supplier's account, go to the Offers section. Being in the section, you need to click on the Promotions button.
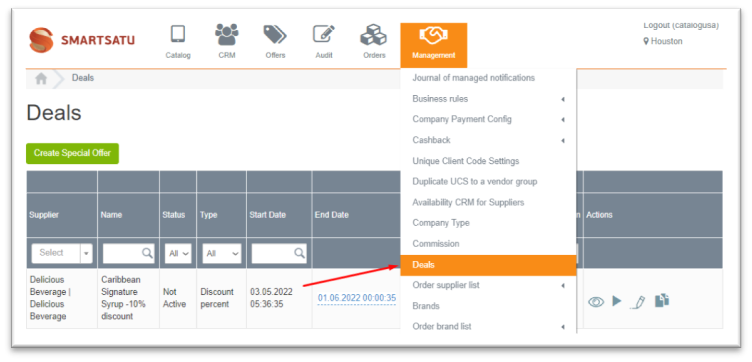
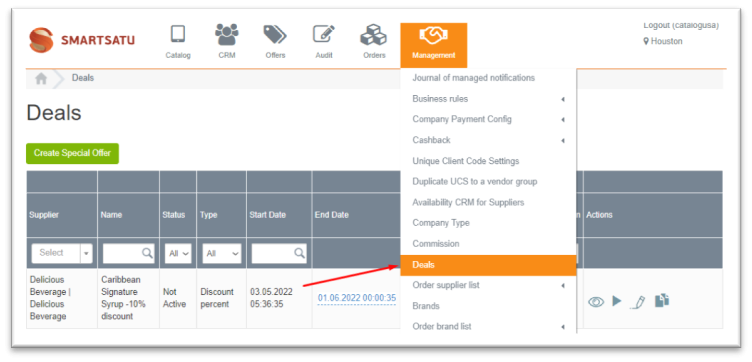
To create a new promotion under the catalog administrator or administrator account, go to the Management section>Promotions.
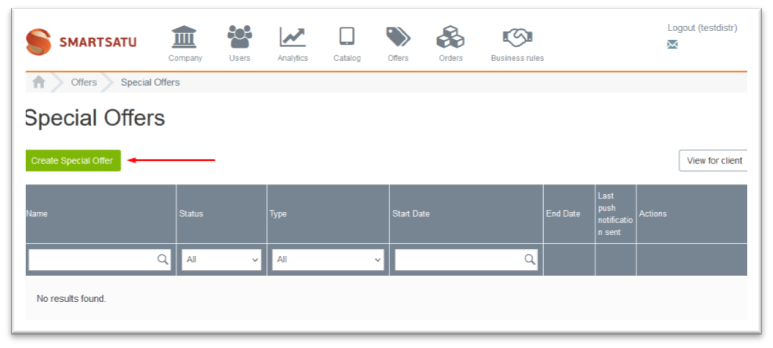
Being in the section, you need to click on the Create a Promotion button.
-
-
Push Notification Settings
-
Selection of retailers
-
Verification and confirmation of the promotion
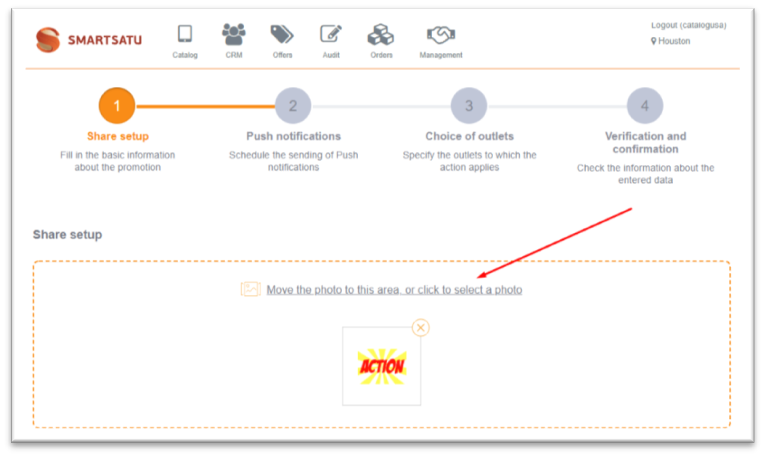
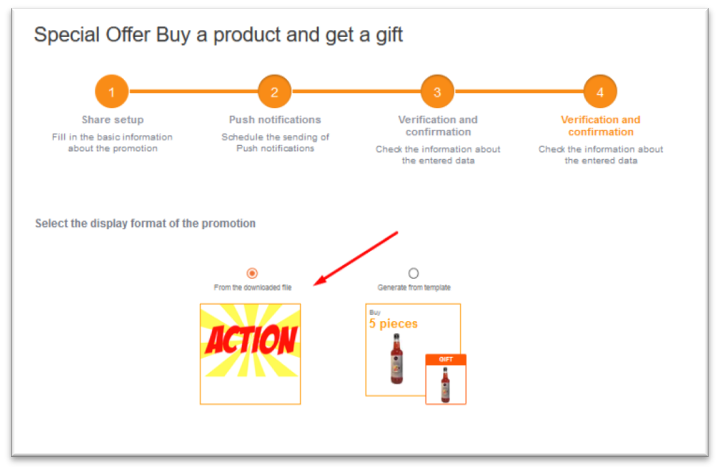
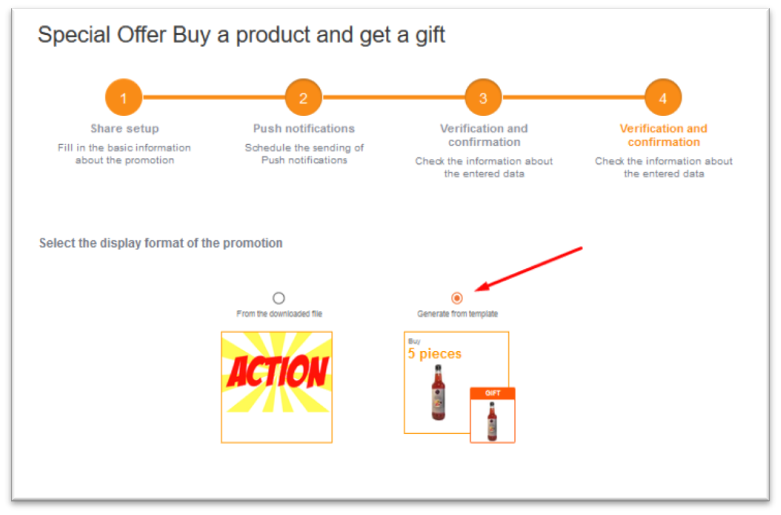
At the first step, you need to select an image for the promotion that will be visible to users of the system.
The system automatically generates an image for promotions with the following settings:
-
Buy: goods in quantity [xxx] – Get: discounted goods [yyy]
-
Buy: goods in quantity [xxx] - Get: discount on the brand [yyy]
-
Buy: goods for [xxx] - Get: discounted goods [yyy]
-
Buy: goods for [xxx] - Get: goods as a gift in quantity [yyy]
-
Buy: brand goods in quantity [xxx] - Get: discount on brand [yyy]
-
Buy: brand goods for [xxx] - Get: discounted goods [yyy]
-
Buy: brand goods for [xxx] - Get: goods as a gift in quantity [yyy]
The template uses the current image of the product card for which the promotion is being set up.

Next, you need to fill in general information about the promotion:
-
Choose a supplier
-
-
The start date of the promotion
-
The end date of the promotion
-
The update rate of the promotion timer
-
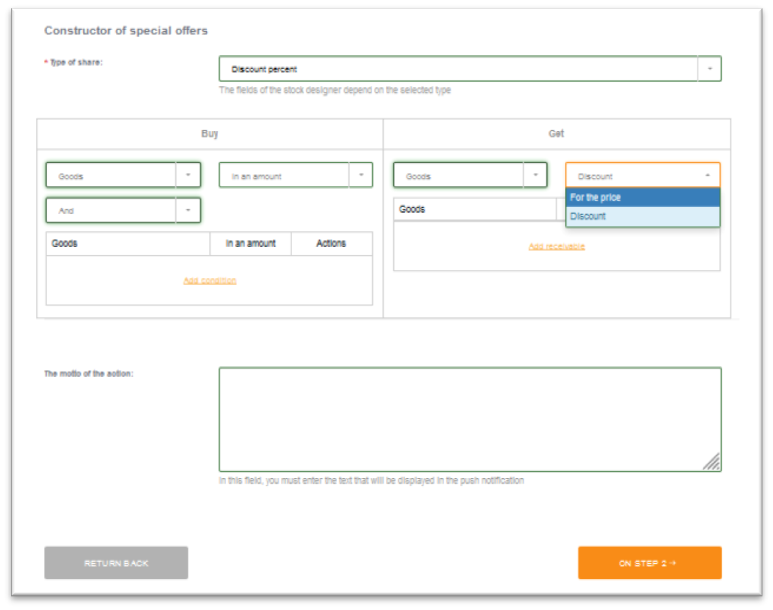
Description of the promotion
Automatic timer update allows you to show Retailer, that there are several days left before the end of the promotion. In this case, the timer will automatically update the value throughout the duration of the promotion.

The system has the possibility to create two types of promotions:
-
Buy X - get a discount - if the conditions of the promotion are met, the retailer receives a discount on a product or a group of products.
-
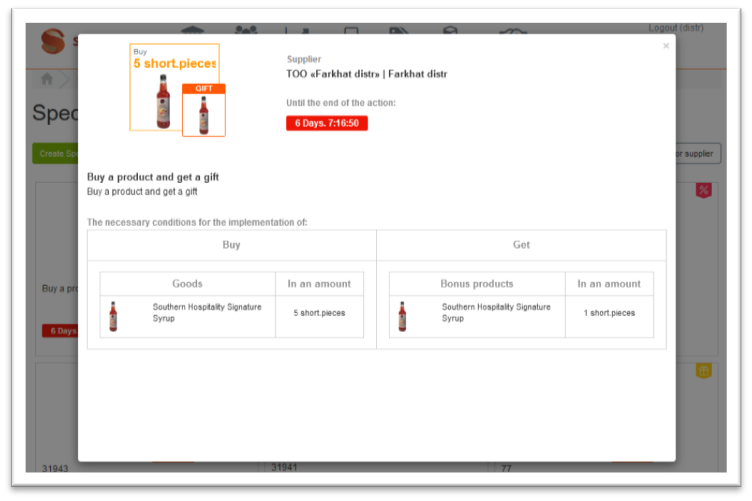
Buy X - get a bonus product - if the conditions of the promotion are met, the retailer receives a bonus product or a group of products
Buy X - get a discount.
-
Select the required type of promotion.
-
Specify the conditions of the product or group of products that need to be purchased for the effectiveness of the promotion conditions
-
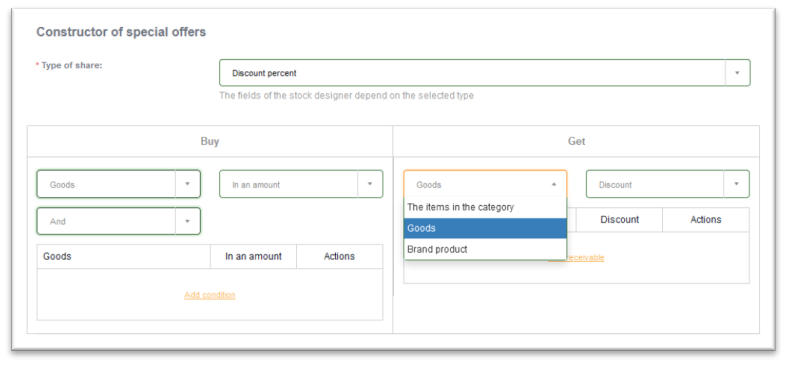
Specify the products or a group of products to which the discount will apply as a result of fulfilling the conditions of the promotion.
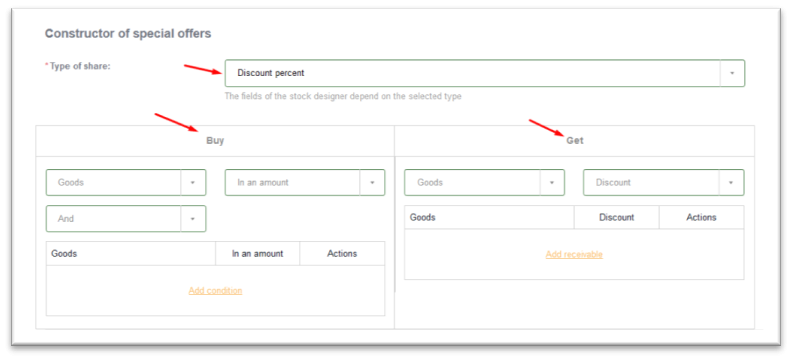
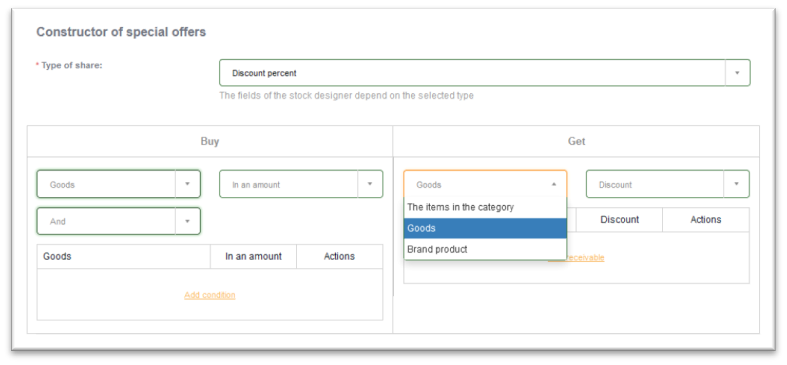
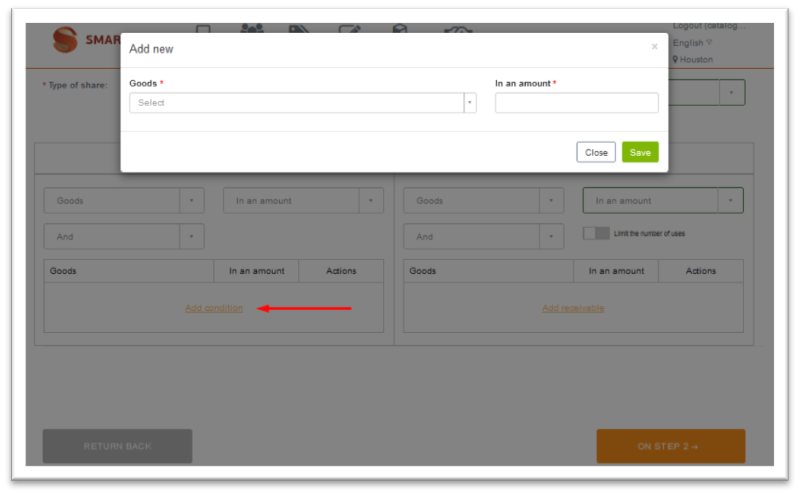
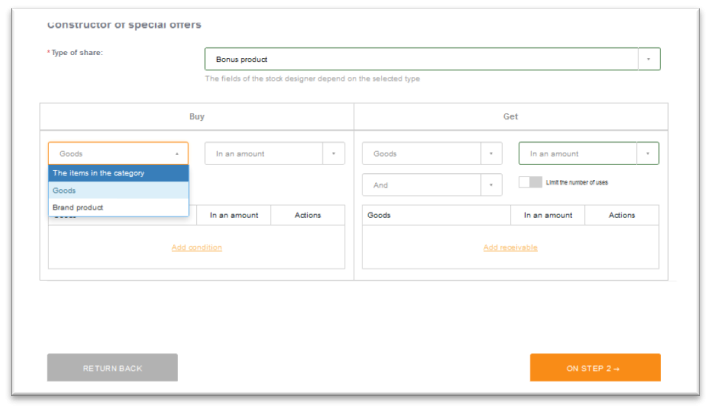
To set the conditions of the promotion in the constructor, you must select the type of product or product group, as well as the condition "AND", "OR"":
-
Product in the category - this item means that the condition of the promotion will be any product from the selected category or several categories.
-
Product - this item means that the condition of the promotion will be any product or products, regardless of the category.
-
Brand product - this item means that the condition of the promotion will be any product of a particular brand or several brands.
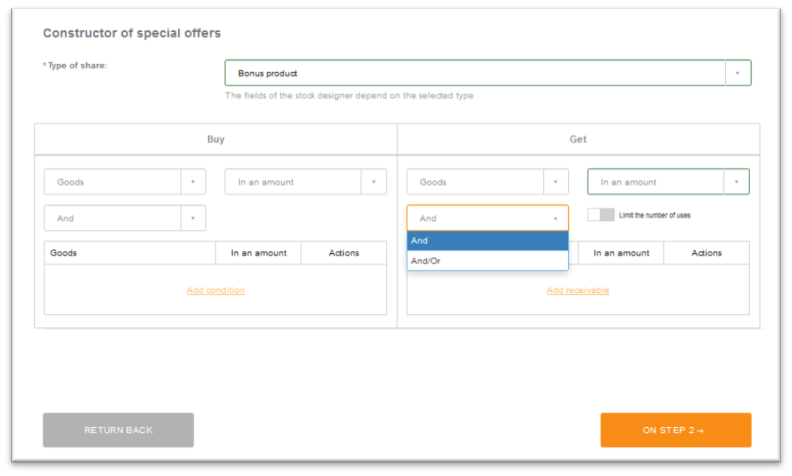
Condition "And"
The "And" condition is used to determine the full set of products/categories/brands that must be purchased to fulfill the conditions of the promotion. For example: buy milk "And" kefir "And" sour cream to get a 10% discount on bread.
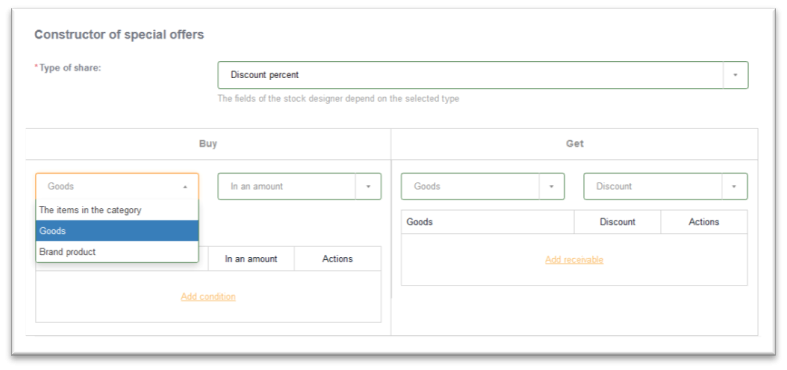
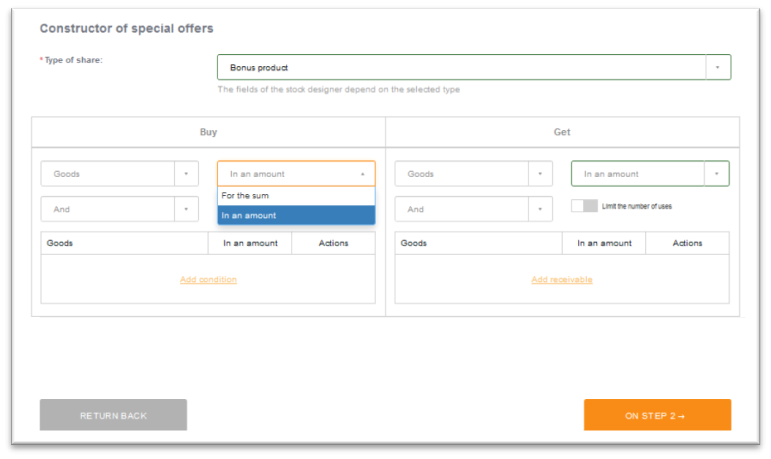
Next, you need to select the numerical values in which the product or product group will be measured:
-
For the amount - this item means that the product or product group must be collected for a certain amount.
-
In quantity - this item means that the product or product group must be collected in a certain quantity.

Next, you need to select the logical element of the promotion terms "And" or "Or".

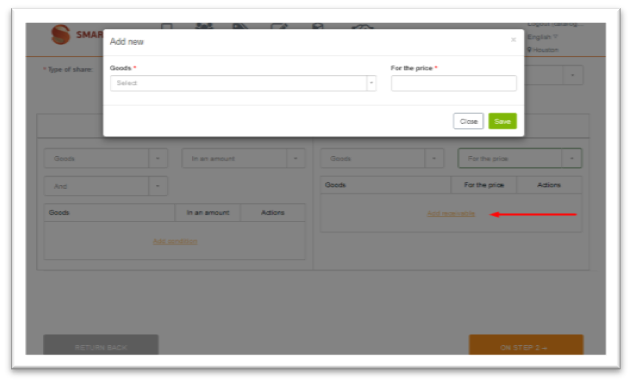
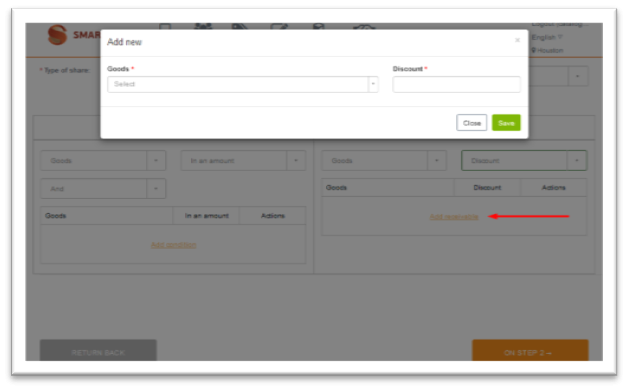
After the settings for the conditions block are selected, it is necessary to add values for the parameters selected in the previous stages. To do this, click Add conditions and specify the values.

-
Product in a category - this item means that the condition of the promotion will be any product from the selected category or several categories.
-
Product - this item means that the condition of the promotion will be any product or products, regardless of the category.
-
Brand product - this item means that the condition of the promotion will be any product of a particular brand or several brands.
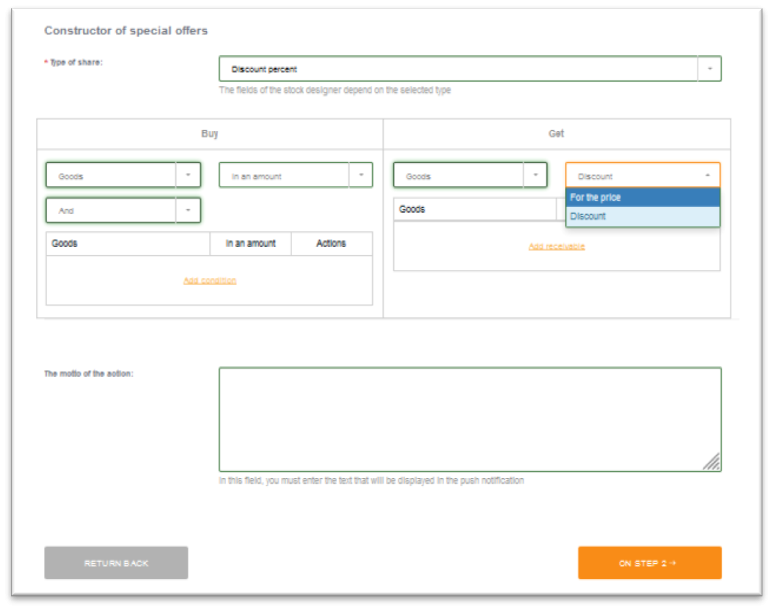
There are two numeric value types available for this type of promotion:
-
Product by price - the final cost of the product when the conditions of the promotion are met;
-
Discount - a discount on the product as a percentage, which Retailer will receive if the conditions of the promotion are met.
The "Product by Price" option is available only for a specific Product and does not apply to a Product in a category or a brand Product.
The "Products by Price" from the Get block cannot also be less than or equal to 0 and exceed the cost of the products from Get block.
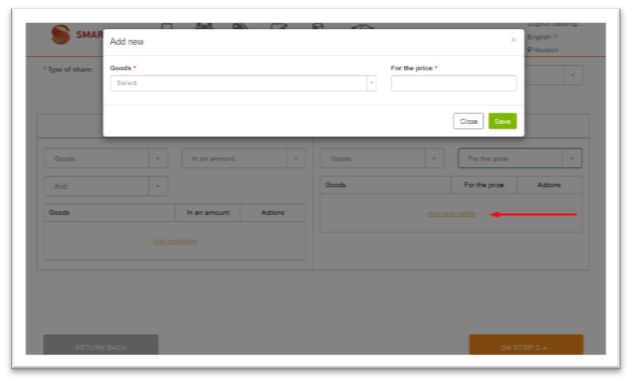
After the settings for the get block are selected, it is necessary to add values for the parameters selected in the previous stages. To do this, click Add to Get and specify the values depending on the selected type of discount: the final price of the product or a percentage discount.
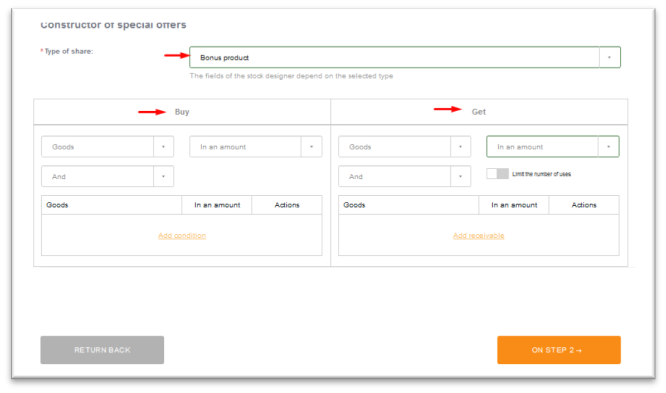
Buy X - get a bonus product.
-
Select the required type of promotion.
-
Specify the conditions of the product or group of products that need to be purchased for the effectiveness of the promotion conditions
-
Specify the goods or a group of goods for which bonus goods will be issued as a result of fulfilling the conditions of the promotion.

To set the conditions of the promotion in the constructor, you must select the type of product or product group, as well as the condition "AND", "OR":
-
Product in the category - this item means that the condition of the promotion will be any product from the selected category or several categories.
-
Product - this item means that the condition of the promotion will be any product or products, regardless of the category.
-
Brand product - this item means that the condition of the promotion will be any product of a particular brand or several brands.
Condition "Or"
The "Or" condition is used to determine any product/category/brand from a set of products/categories/brands that must be purchased to fulfill the conditions of the promotion. For example: buy milk "Or" kefir "Or" sour cream to get a bonus product - bread.
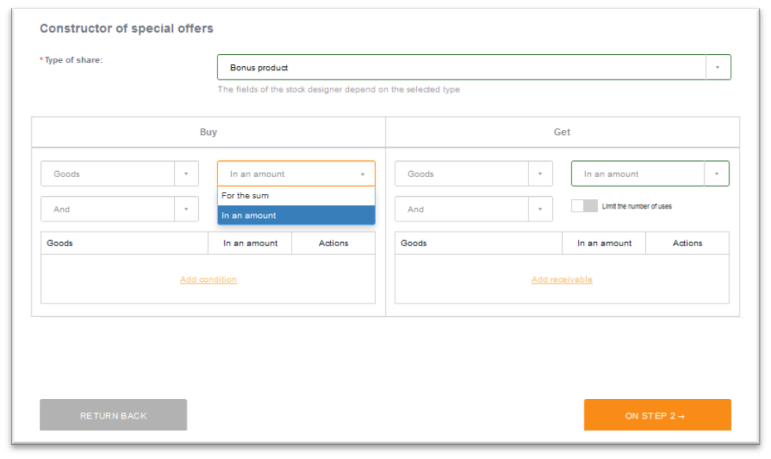
Next, you need to select the numerical values in which the product or product group will be measured:
-
For the amount - this item means that the product or product group must be collected for a certain amount.
-
In quantity - this item means that the product or product group must be collected in a certain quantity.
After the settings for the conditions block are selected, it is necessary to add values for the parameters selected in the previous stages. To do this, click Add conditions and specify the values.

After the conditions of the promotion are filled in, it is required to specify the bonus product and its quantity, which will be issued if the conditions of the promotion are fulfilled. Variability is available for this type of promotion:
-
And - if the conditions of promotions are met, Retailer will receive several bonus products;
-
OR - if the conditions of the promotions are met, Retailer can choose one of the bonus products when placing an order.

After the settings for the get block are selected, it is necessary to add values for the parameters selected in the previous stages. To do this, click Add to Get and specify the values.

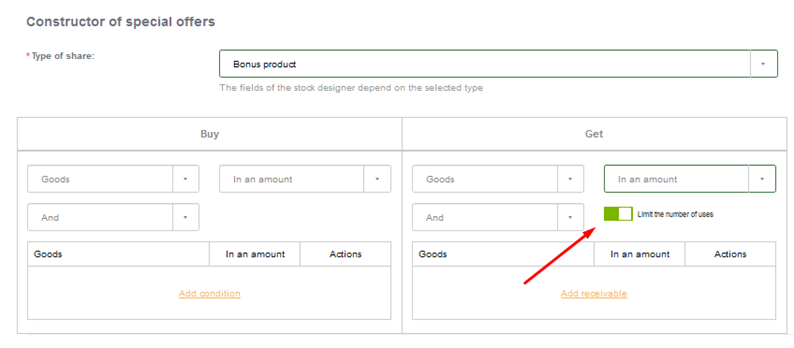
If necessary, you can limit the number of bonus products received by the retailer.
To do this, you need to set the Limit the number of applications parameter.
Thus, the product in the Get block will be issued to Retailer only once, regardless of the number of times the conditions of the promotion are fulfilled.
Example:
Buy any Pioneer flour and 2 boxes of Pioneer cookies in the assortment get a BONUS of 2 pieces of packaged cookies with the taste of melted milk
If the parameter "Limit the number of applications" is not set, then after Retailer buy 3 any pioneer flour + 6 boxes of cookies, he will receive a bonus of 6 pieces of packaged cookies with the taste of melted milk.
If the parameter "Limit the number of applications" is set, then after Retailer buys 3 any pioneer flour + 6 boxes of cookies, he will receive a bonus of 2 pieces of packaged cookies with the taste of melted milk.
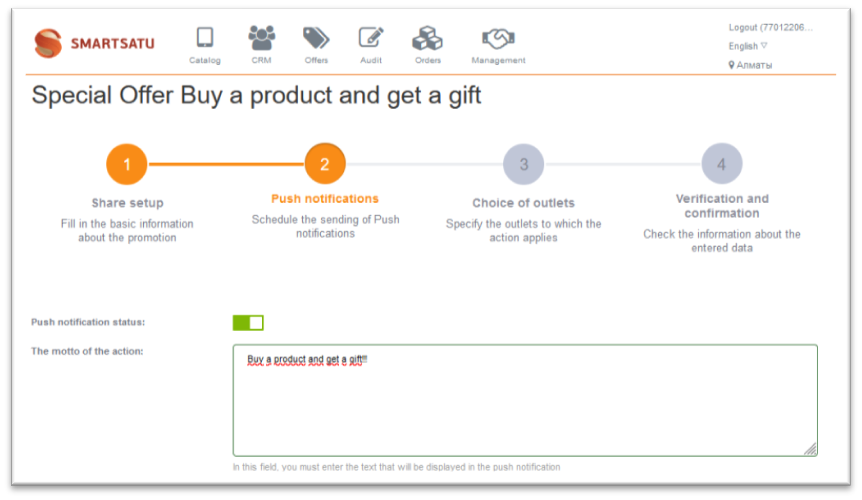
To notify retailers about the new promotion and create a media plan, it is necessary to:
-
Enable push notifications
-
Specify the text of the notification that will be displayed on the user's mobile device.
The length of the push notification text is limited to 45 characters.

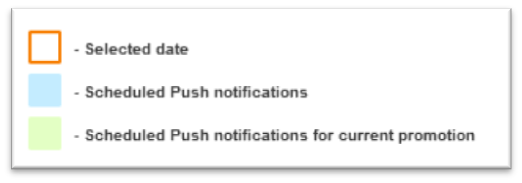
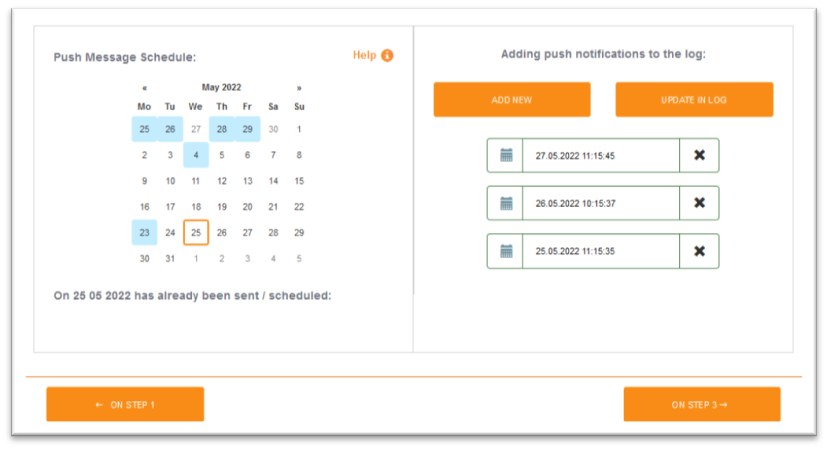
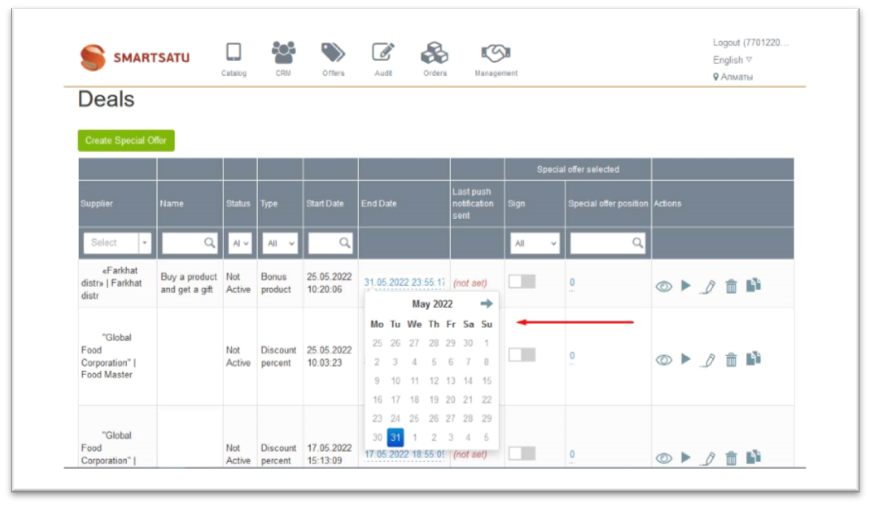
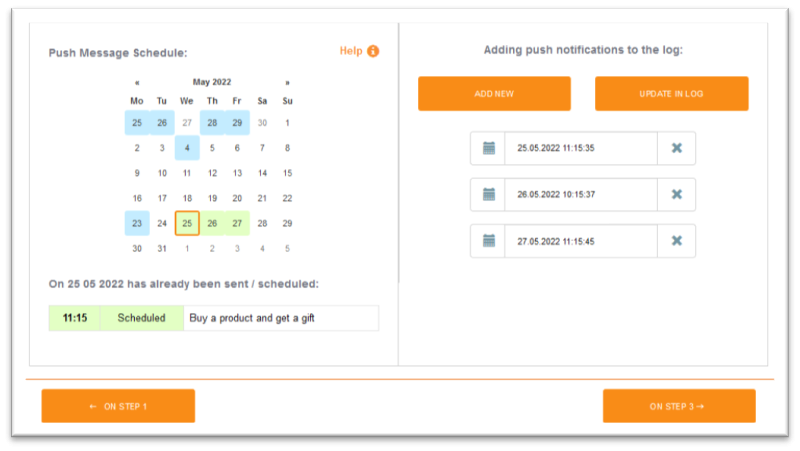
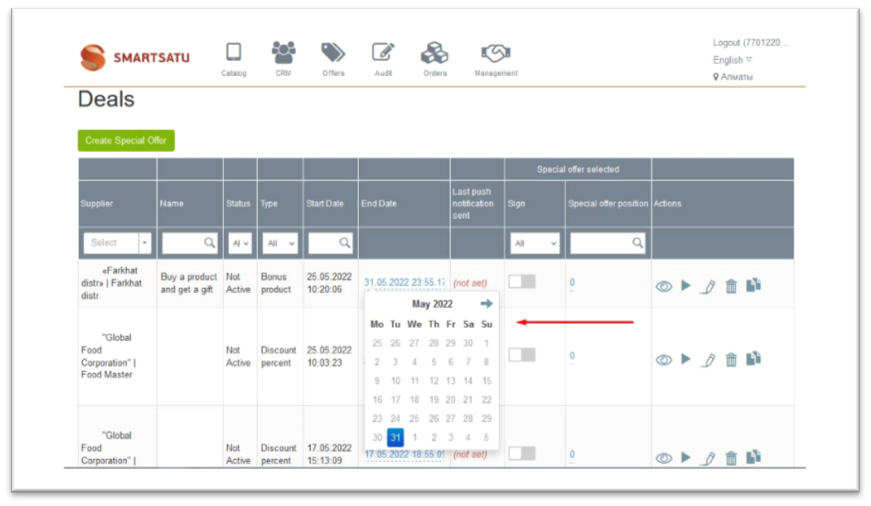
You can view the media plan of push notifications on the calendar.
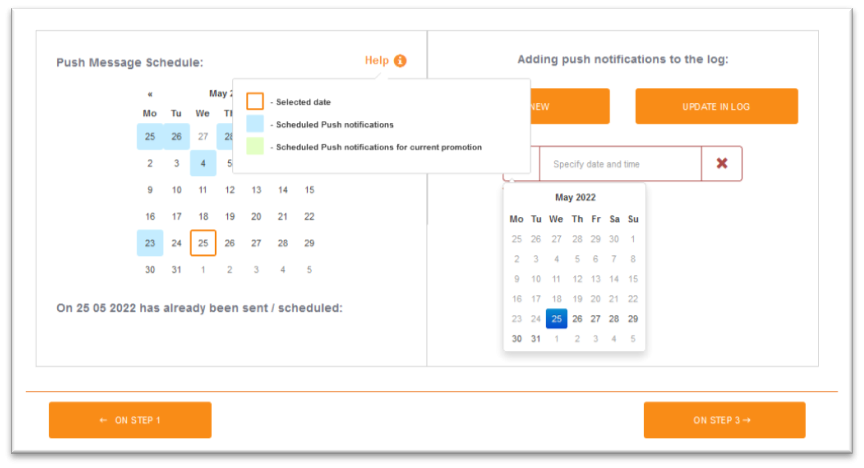
Dates in the calendar are encoded in different colors:

To add a new notification to the media plan, you need to use the Add Record button. When adding a new push notification, you need to select a date and time in the calendar. You can add multiple entries at the same time.

To update the data in the calendar, you need to click the Update in the log button. After the update, the scheduled push notifications for this promotion will be displayed in orange in the calendar.
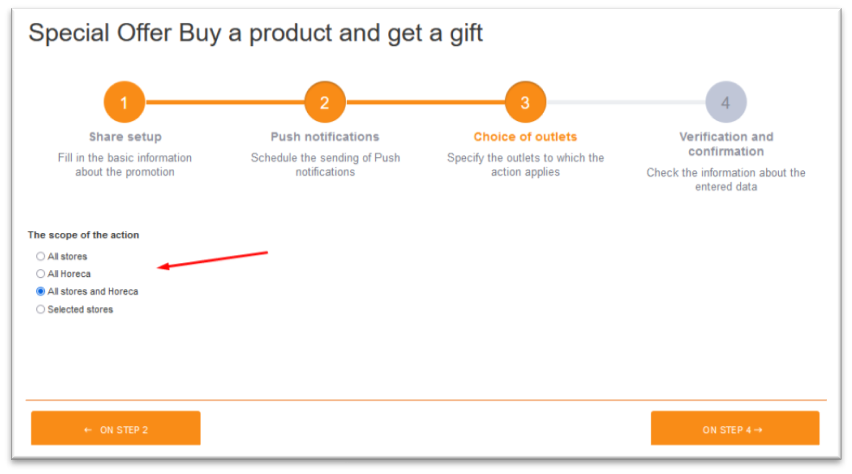
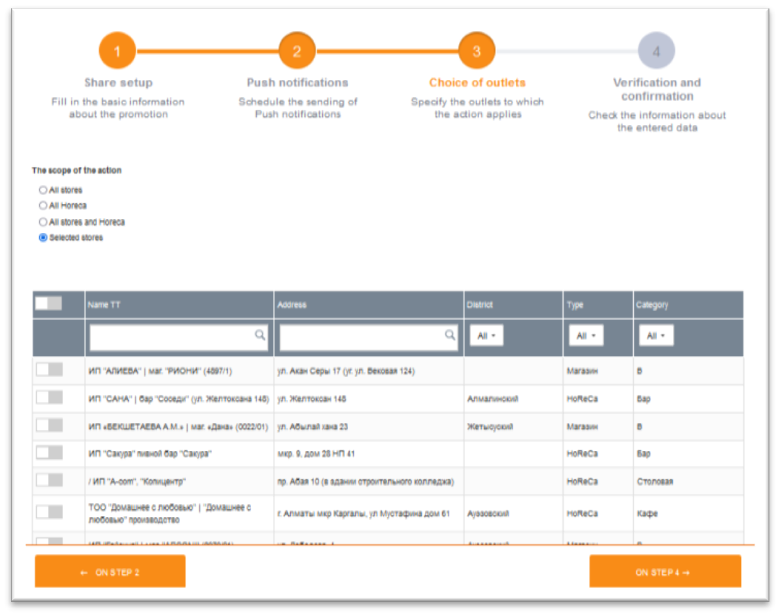
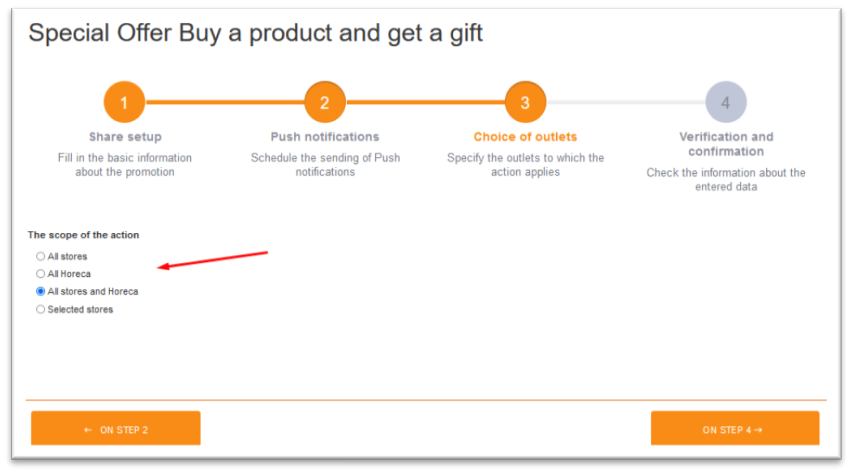
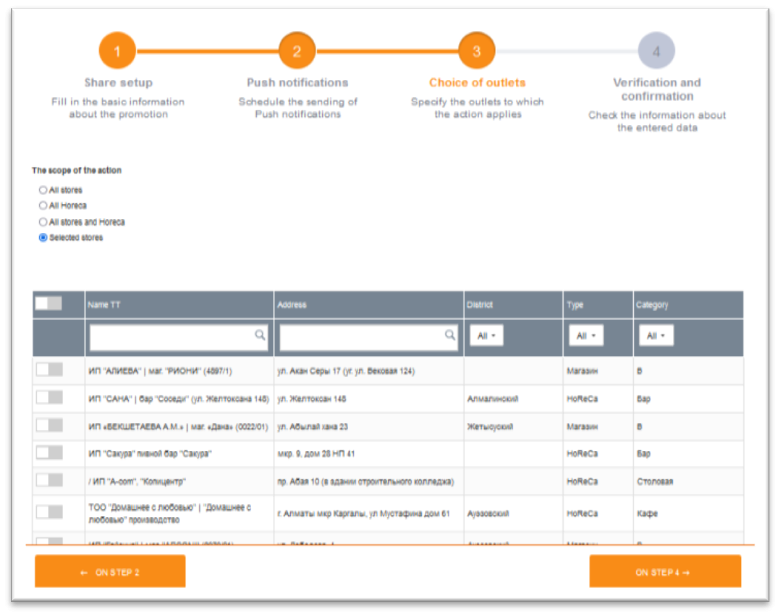
At the third step of creating the promotion, you need to select the retailers for which the promotion will be available. For convenience, you can use quick filtering of retailers:
-
All stores;
-
All HoReCa;
-
All stores and HoReCa;
-
Selection from the list.
The selection from the list is a list of Retailers that can be filtered:
-
All Retailers - promotion will be available to all retailers that are present in the system at the moment, as well as to all retailers that will appear in the system in the future.
-
All Retailers having BP discounts/surcharges - the promotion will be available to all retailers for which there is already a discount business rule or a surcharge business rule.
-
All Retailers that do not have BP discounts/surcharges - the promotion will be available to all retailers for which there are no single business discount rules or business surcharge rules.
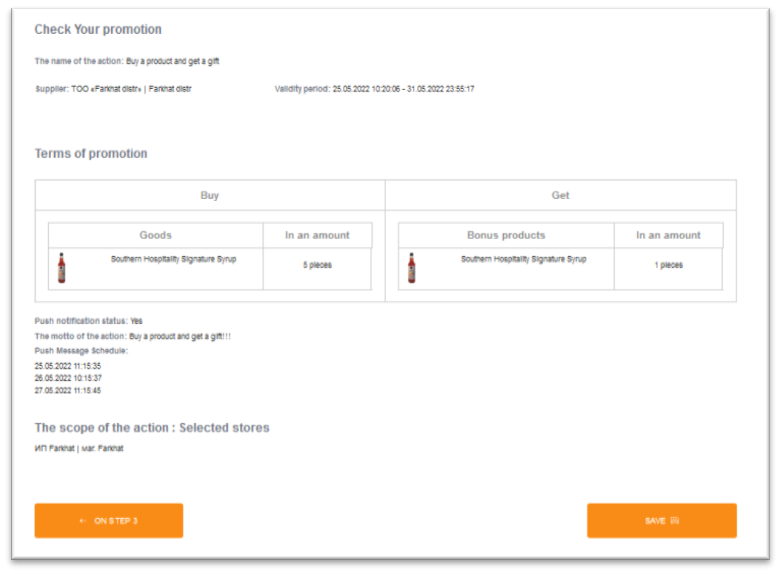
At the fourth step, it is necessary to check the specified parameters of the promotion and, if necessary, return to the desired step for correction.
This step is very important, because after creating the promotion it becomes unavailable for editing.

Or select the generated template.
The system automatically generates an image for promotions with the following settings:
-
Buy: goods in quantity [xxx] - Get: discounted goods [yyy]
-
Buy: goods in quantity [xxx] - Get: discount on the brand [yyy]
-
Buy: goods for [xxx] - Get: discounted goods [yyy]
-
Buy: goods for [xxx] - Get: goods as a gift in quantity [yyy]
-
Buy: brand goods in quantity [xxx] - Get: discount on brand [yyy]
-
Buy: brand goods for [xxx] - Get: discounted goods [yyy]
-
Buy: brand goods for [xxx] - Get: goods as a gift in quantity [yyy]

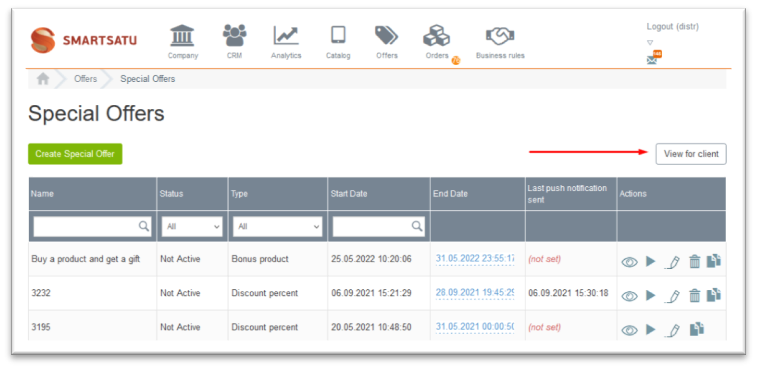
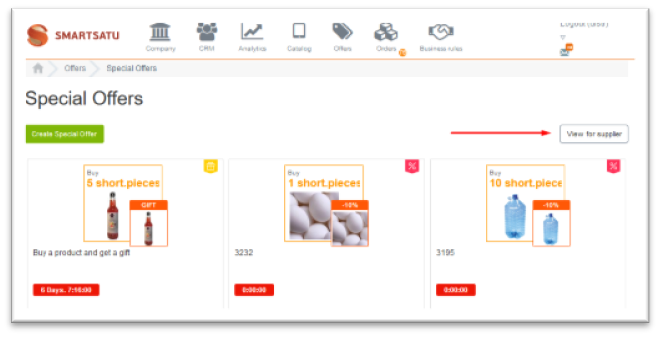
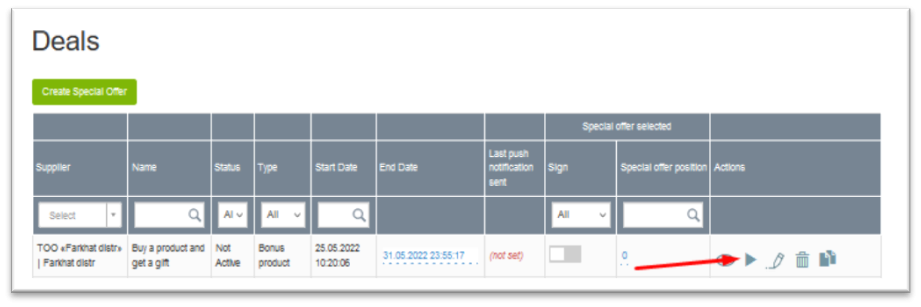
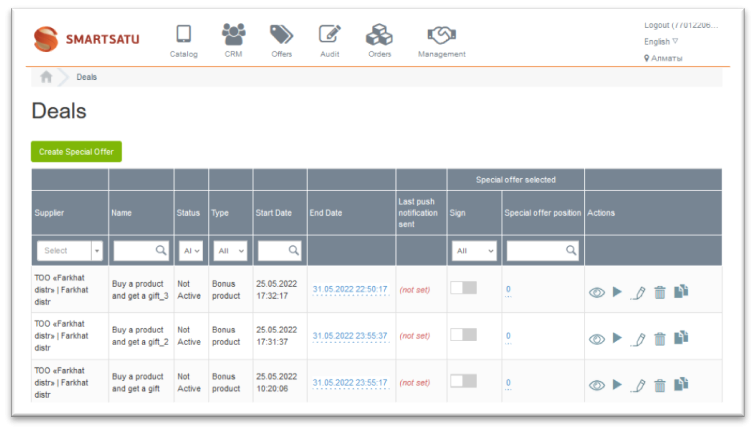
After saving the promotion, it becomes available in the Promotions section. To launch the promotion, you need to click on the appropriate button.
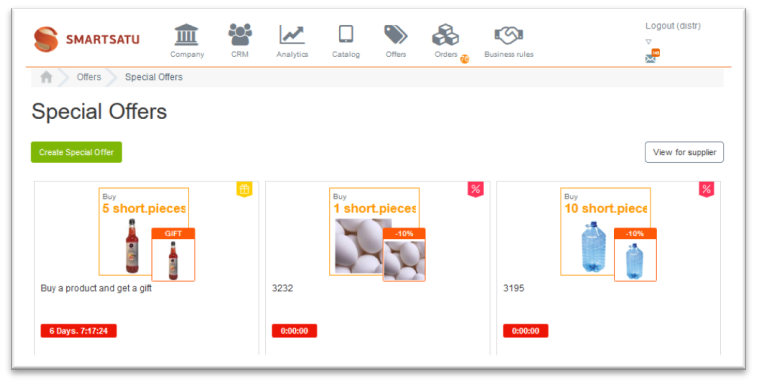
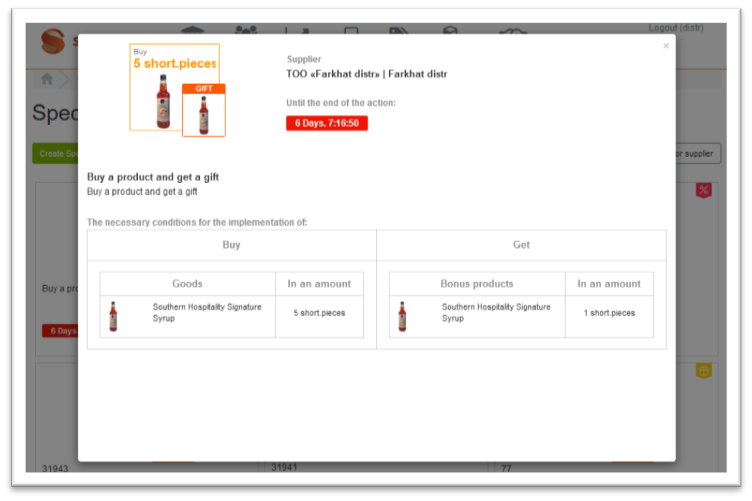
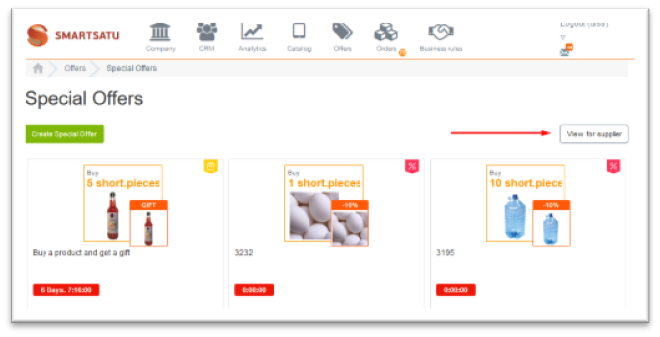
The supplier has the possibility to view the promotions in the form in which they are presented for retailers. To see the list of the supplier's promotions through the eyes of the client, you need to click the View for Client button.


To return to the supplier interface, you need to click on the View for Supplier button.
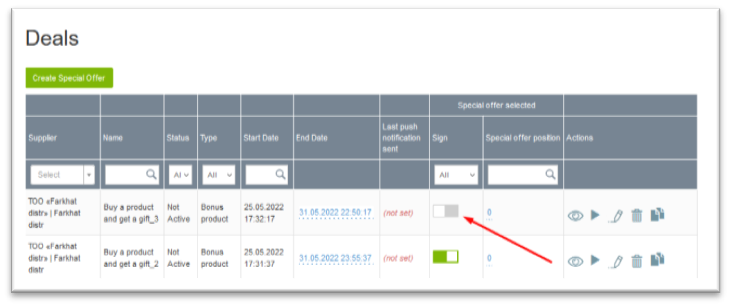
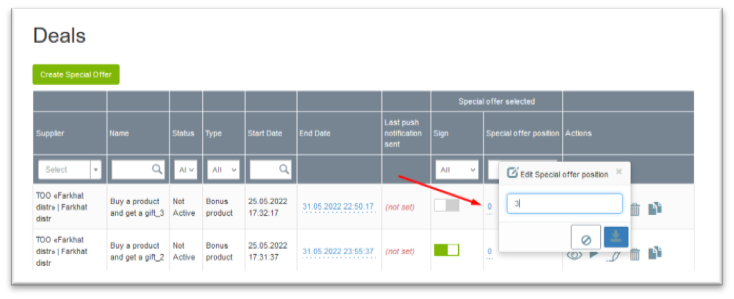
The system has a mechanism for randomly mixing promotional offers from suppliers in the list of Selected promotions. At the same time, there is the possibility of fixing a specific position of selected promotions in the promotion catalog.
-
-
Favorites with a fixed position are monetized positions that have their location in the section according to the assigned position number.
-
-
-
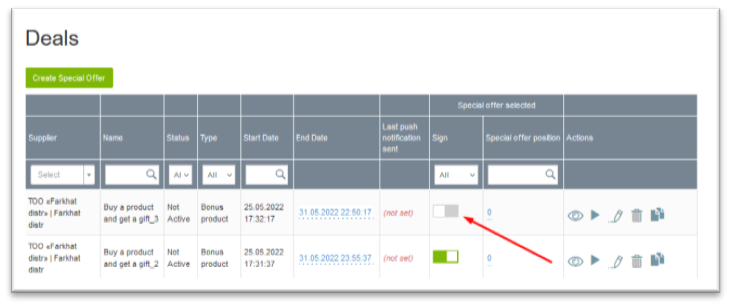
To set a specific promotion position in the catalog section, you must specify the fixed position number.
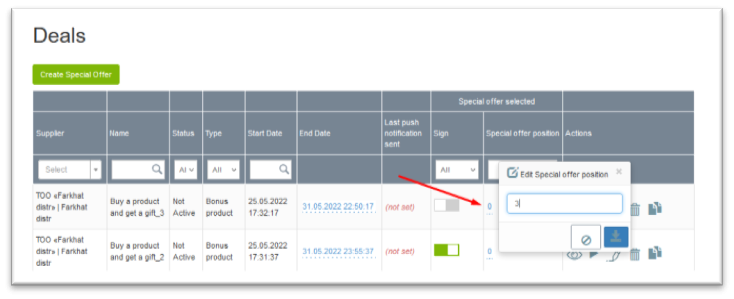
Mechanics of joint work of selected promotions with a fixed position number and ordinary selected promotions:
-
If there are selected promotions with fixed position numbers 1, 2, 3, 5 and at the same time there are no other selected promotions without a fixed position, the promotions will be shifted so that there is no empty space for 4 positions.
-
In the presence of selected promotions with fixed position numbers 1, 2, 3, 5 and the simultaneous presence of other selected promotions without a fixed position, promotions without a fixed position will be randomly withdrawn to 4 positions.